Showing posts with label hair. Show all posts

Help Jae Decide!

Wednesday, February 2, 2011

Every January/February, I start to get restless and want to do something drastic with my appearance. The year before last I cut off about eight inches of hair and hated it, so I don't want to do anything THAT drastic. I settled on some new hair color. Problem is, I can't decide which way to go. Will you lovelies help me figure it out?

Here are some pics to help you decide. It should be known that I've been dyeing my hair since I was 14 and I know one day it will fall out and I'll go bald. I'm just banking on some amazing advances made in the world of wigs when I'm old. I'm OK with that.
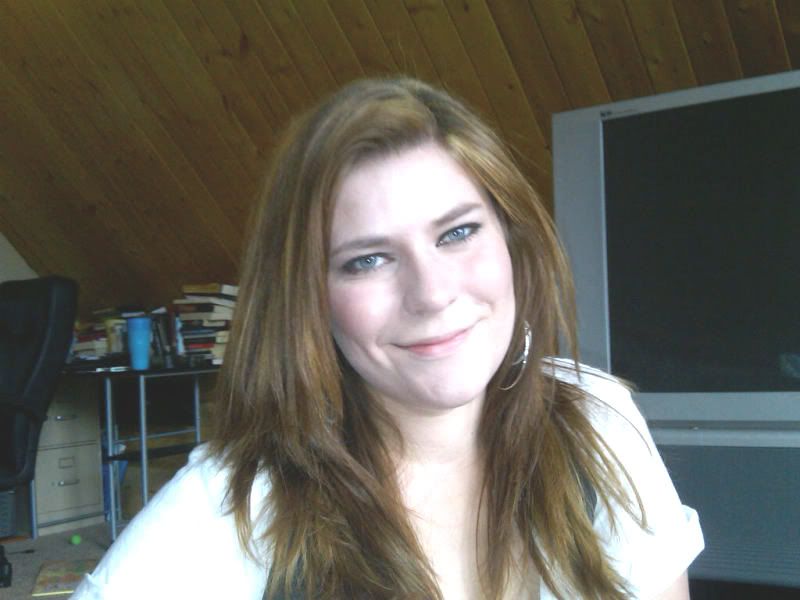

Photobucket

This was me last year, with the blondest hair I've ever had. I don't mind going lighter, it's just that I'm SO PALE. My mom is a redhead and I was blessed with the fair skin and blue eyes without the hair color. I've considered an ashy blonde but I'm scared, guys!! And I haaaaaate brassiness. I abhor brass in any form. Unless they're buttons on a cute jacket. That's fine. Not on my head.
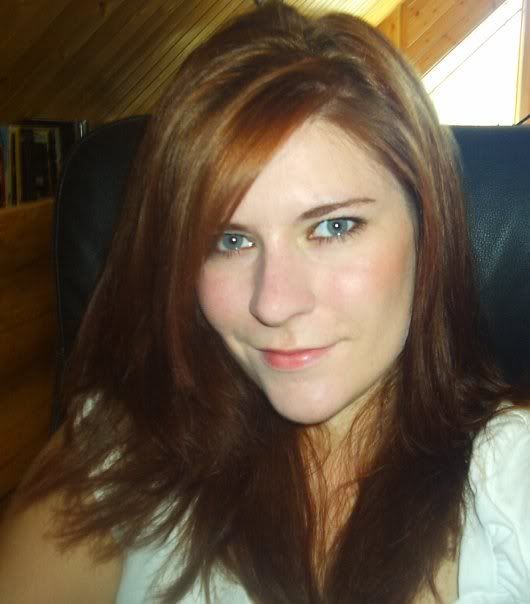
Photobucket

This is in 08 (I think!?) when I was really red. I love having red hair because it suits my skin color really well and makes my eye color pretty intense. I hate when it goes orangey. Orange hair is never OK. But I was a definite fan of this look.
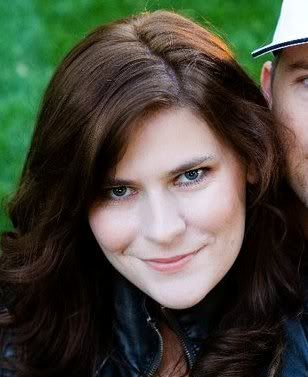
Photobucket

Geez, could my head be anymore heart-shaped? Anyway, this is the most recent hair color. My natural color from when I was like, a baby is ash brown. I was trying to get back to that color without being too mousey. I really liked it for when we did family photos because it looked polished and crisp. But now I'm afraid I'm veering into mousey again.

Also, I look quite mischievous in that photo.


My hair was almost black during my second pregnancy. I thought it was a little too dark for how pale I am but I enjoyed not worrying about my roots when I was in the hospital for six weeks. I proooobably don't want to go here again. When I first did it, I panicked and made my little brother buy me the Color Oops stuff to remove some of the darkness.

Things to consider:
I am the whitest white person ever known to man. I wear the lightest shade makeup in every brand.
My hair is uncontrollably thick. I had a ton sliced out during my last haircut, but the funny thing about hair is that it grows.
I will never go drastically red because I already look just like my mom. We don't need to be twins.

See? She's adorable... but I get enough "You look JUST LIKE YOUR MOTHER"s without having the same hair.
(She's going to be like what the eff Jae, why did you post a picture of me. Then she'll get mad because I said eff. CHILL OUT MOM.)

So what is the consensus? If I don't get an answer soon I swear I'll end up chopping my hair off and hating life. I am quite enjoying my lovely long locks right now. Don't make me do it. I need a trim anyway, but I am the kind of person who will decide five minutes before my hair appointment that I want like, a mohawk or something.


Poll: What Do Ye Say?


Results:


I totally accept an "other." Leave your thoughts in the comment. Although I dyed my hair so dark it was almost black once and it was bad news bears.

Fast Hair Fix

Wednesday, August 18, 2010

So the other day there was a lively discussion in a forum that I frequent about what consisted as "mom hair." When I weighed in I said that it was any hair that wasn't "done," and I think I need to restate my opinion. As a mom, you don't have hours to spend on your hair. I get it. When I was in high school I would literally spend HOURS making twisties and tiny braids and ponytails every day. Now, I usually have 15 minutes flat to get from shower to door any time I leave the house. So I take it back. "Mom hair" isn't hair that hasn't been done, "mom hair" is when I can tell the poor woman has thrown in the towel and resigned herself to giving up and simply stopped trying altogether.

I see them alllll them times. Moms in scrunchies, or clearly air-dried but not styled hair. A daily uniform of ponytails or the messy bun. All can be construed as "mom hair" when it's clear that you've just given up and stopped trying at all. You look the same every day and that same doesn't make you feel good about yourself. It's just there and you don't care (YESS RHYMES... )

"Doing" (OMG I am using so many quotes in this post) your hair doesn't mean hours of work. It means making sure that your hair contributes to your look for the better. I cannot stand hair that just hangs there. Just DO something with it, for heaven's sake.

To prove it to you, I present to you three hairstyles that took me three minutes or less. Of course, these hairstyles will work best with medium to long hair, like I have. If you have short hair, you can adapt them. If you have really short hair, then you're lucky. Run some product through it like my girl Jenna, and call it day. But seriously. You HAVE three minutes to do your hair. I promise. Also, if I see your daughter with a complicated style and you're wearing a scrunchie, I will judge you. Your daughter does not need 50 ponytails. Stick a flower clip and call it good while you try and look presentable.

First up: The Side Braid


If you can do a basic french braid, this one will be easy for you. If you don't know how.... ummm definitely go ahead and Youtube that one. You should know. I do this when my hair has air dried and I haven't done a thing to style it. I grab the top half of my hair at the back of my head and start french braiding. Instead of braiding down, I braid on the diagonal so the braid flops over my shoulder.


See? Diagonal and downward. It's so cute and casual and literally takes me a second. I do it in the car all the time when my hubs is driving because I don't need a mirror and I'm perpetually running late. SO EASY. Then I pull a few strands out around my face and I am dunzo.

The Braid Band


Here's another ridiculously easy way to do braid. I use this when I haven't had time to style my bangs and they need to be puled back. I also do it when I don't have time to dry my hair because my hair is pretty wavy and I think it looks cute and beachy. I grab a small portion of hair in a deep side part, and then french braid across my forehead. When I get to the ear, I pin it back. I might comb some gel or mousse through the body of the hair to get it wavier... but in this pic I was on my way to the pool and I just wanted to keep my hair out of my face.

(PS I'd like to point out that I stopped using sulfate shampoo, and I am so happy with the results. The above pic was taken when I was using regular SLS stuff, and the first pic is today... such a difference, right!? My hair is so shiny. Okay,... tangent there... we'll talk shampoo another day.)

Fakey Curls


So curls are pretty universally hot, but I don't always have the time to curl all my hair. My hair is wavy but I usually add curls with the flat iron technique. If I'm short on time, I fake it by clipping the top portion of my hair up with two bobby pins, crossed for better leverage. Then I scrunch some product through the bottom layer and add a curl here or there to fake like I spent forever on my hair. Then I fake fullness by holding my hair up and dropping it slowly in sections while interspersing a blast of hairspray in between. Done!

BONUS! Accessory Time!


Quite frankly, if I'm really pressed for time, I use a low, messy bun and slip in a head band. I picked up this beaut from F21 and have been wearing it 24/7. It looks like I put all this effort into it when I really just threw it in there. When you get a new hair accessory (and your daughter isn't the only one who should have those, BTW) test drive a few different ways to wear it. I bought this thinking I would wear the flower more on the side of my head with my hair down, and it ended up looking WAY better lower and with my hair up. Remember that in case you purchase something you don't totally love; it could just be the way you're wearing it.

So aside from the skeezy Myspace-style self-photos I've had to use to demonstrate, I think this is all totally doable in the real world. I promise you I'm not some fem-bot who does a full on blow out every day. In my lack of time, I've learned to get creative and try more casual looks that help me stay put together without being a total time-suck. As much as I love neglecting my children, they can be pretty annoying when I'm trying to carve out a few moments of pretty-time for mommy.

You have three to five minutes. Use them wisely.

Skills: 10 Steps to the Perfect Blowout

Wednesday, June 16, 2010


(Ah! Pretty hair that I covet! This here is pretty much the perfect blowout. )

...and I don't mean in your baby's diaper. Those ten steps would be like 1) Feed your baby prunes and apple juice all morning. 2) Leave the house without your typical *just in case* extra diaper... etc. OMG the diaper blow out in public. Is there anything worse? Actually, no... one time I was in a store when my daughter was a year old and she totally projectile vomited everywhere. But diaper blowouts are pretty gross. Luckily, we're not talking about them today.

We are talking about HAIR blowouts. You know when you get your hair done, and the stylist blow dries it all perfectly silky smooth, and then you can never seem to replicate the job at home? Yeah that. Now I prefer to do my own blowouts so much that when I have my haircut I never let her dry it. I head home with it wet, where I can assess the hairstyle and style it my own way. I've had too many bad experiences where what I thought was a terrible haircut (PANIC!) was just a too-fluffy blowdry job (HOORAY!)

You should know how to get a perfect blowout. That means hair that has volume without being too terrifying or without having it go too flat. I like y blowout to have a little curl, but it totally depends on the texture that you have. If you have for real curly hair, you can complete the blowout steps with a diffuser for really defined curls.

Ready? Have your pen out? You better be taking notes! At the end there will be a test.

1) Start with wet hair straight outta the shower. I don't always condition my hair, but I always do when I know I'm going to be doing a blowout. When you get out of the shower, don't scrub your hair dry. That just ruffled the hair shaft and practically guarantees flyaways. Pat it dry.

2) Pop in some product. I am a mousse lover because I like the volume. But gel is fine, as is serum, if you have frizzy hair. Instead of just scrunching it through, apply it directly to the roots. I work mine in like I work in shampoo. Then, comb the product through to the ends. YAY.

3) Clip the top portion of your hair with a couple of large alligator clips. If you don't own any, get some immediately. They are awesome. Just part your hair by running your thumbs across the tops of your ears and pinning the top portion on top of your head like a weirdo.

4) Get your dryer and brush ready. I prefer to do the bottom portion of my hair without a brush, and just run my fingers through while I do the bottom portion, so it doesn't look so *done*. But a round brush will give you a good shape if you're not comfortable with going without. Point the dryer DOWN from the top of your head, directing the heat to the exposed hair. Pointing down with give you the smoothest results. Anyone who has seen a hair care commercial knows that your hair shaft can get all frazzle-y otherwise.

5) Once the bottom portion of hair is like, 80 percent dry, unclip the top. This is because as you blow dry the top of your hair, the bottom portion will be dried the rest of the way. If you dry it 100 percent, you could be burning it. NO GOOD.

6) Work with your haircut to dry the top portion of your hair in the same way as you did the bottom. If you have a shorter hairstyle, you're going to be working with your brush more to nudge it into the right shape. If you have longer hair, it's pretty easy to just dry it into shape. I flip all of my hair to once side and blast the hair dryer at the roots to get better lift, then I point downward as I slowly flip sections back over to the right side.

7) Heat up a flat iron or curling iron. I run it through the top layer of the hair only, and then twist the ends so I get a bit of bouncy curl at the bottom. Or, for straight hair, run the flat iron through while following the path of the iron with a round brush. The shape of the round brush will make the volume from the flat iron take hold.

8) Apply a little hairspray or pomade to finish the look. Shorter hair will benefit from pomade because it gives your hair more definition and shine. I prefer hairspray because my hair is longer. To finish off the look I grasp a large portion of my hair on the side, lift it, and spritz short bursts of an aerosol hairspray as I slowly release the hair. It creates little pockets of air and hold that give my hair a more well-rounded blowout.

9) Finally , smooth the top layer of hair over for a sleek look. I sometimes apply a leetle oil to the ends just to they look smooth and not frizzy.

10) Give it once over and wink at yourself in the mirror, sexy laday!

Alright, want to see a finished product blowout? Here's me!


This was my favorite hair EVER but it was red and everyone kept telling me I looked like my mom. Not that that's bad... it just got weird.


This was my family picture blowout that I did around Christmas time. It was EPIC good hair and I congratulated myself quite heartily. Also, I'm wearing false eyelashes and my friend said it looked like an Old Navy ad. Psssshhh if Old Navy had me styling everyone's hair maybe.

So, the blowout. The pretty, non-diaper kind isn't as hard as it seems. It takes a little time, the right techniques and the right products, but once you done it one time, it's super easy. It can even fit into a 30-minute level three! In fact... I think I might do one today (I have a volunteers dinner tonight to go to.) I'll post pics on the Facebook page when I'm done!

PS... I would like to point out that although I was extremely tempted to title this post "Skillz" I refrained. YOU ARE WELCOME, good sirs.

How To: Curl Your Hair FAST

Wednesday, May 12, 2010


So we're all in agreement that it's annoying when someone thinks that because you look put together, you're neglecting your kids, right? Especially when there are so many shortcuts to getting ready that there's no excuse for looking like you walked out of a bad mom commercial.

I was just thinking about how me and my two best friends as a teenager, Vanessa and Erin, would get together for the sole purpose of "getting ready". We would drag all of our hair and makeup stuff to Vanessa's house, because she had the biggest mirror, and take HOURS to get ready for a Friday night. One day, while getting ready, Vanessa discovered :ironing" her hair. Like, actually ironing it. With a clothes iron. Thus commenced a year of ironed hair for all of us.

It really did make it straight!

But ironing your hair is very, very bad for it. Can we say damage? Just think of all the crap you subjected your hair to as a teenager in the name of beauty. Then you have a couple of kids and up into the ponytail it goes! It gets to the point that if you DO style your hair, your husband is all "Hey, did you lose weight? Let's head upstairs!"

My hair is a frustrating cross between wavy and straight, so for me to tame it into submission, it must be styled. And ever since I found this neato little trick, it takes me two seconds to look put together and polished. And now I will dispense this wisdom for you.

CURL WITH A FLAT IRON!

I know that this doesn't make sense. I've been doing it for like, six months and I still don't know really how it works, it just does. And it's so easy and fast.

So you have a flat iron right? A skinny, inch-wide one is best. I usually do this when I've gotten out of the shower and didn't take the time to blow dry my hair, so it's all wild and wavy in weird places. Here's the steps that I take.

1) Brush a mousse or hairspray through your hair to give it a little staying power.

2) Take a small section of one to two inches, and clamp the flat iron in, as per usual, like you're going to straighten it.

3) Then, twist the flat iron upward, so that the top of the flat iron is flat against your head.

4) Slowly drag the flat iron downward, holding the twisted position all the way down.

5) Voila! You should get a) a perfect curl and b) a tangled cord. But we don't care about the tangled cord so much when pretty curls are to be had!

6) Repeat all over your head.

The benefit is that it takes no longer to curl your hair than it takes to straighten it. AND! The curls are loose and natural, not Shirley Temple and girly. Here's a pic of me with flat iron curls (they are also pinned back.) Also, my daughter has them too. VERSATILE!


So honestly, if you have five minutes to spare today, try the flat iron curl and see that it takes two seconds to look out of the ordinary. Then give your flat iron a little kiss NOT WHILE IT'S HOT and thank it for saving you from a lifetime of curling irons. Seriously. I haven't touched mine for like, a year.


ETA: I found a really good tutorial online for those who want to see how it's done. This girl curls in the opposite way than I do, but I think going both ways, turning some out AND turning some in, give a more natural curl over all.

Pages

Powered by Blogger.
Related Posts with Thumbnails
Blog contents © How Not to Dress Like A Mom 2010. Blogger Theme by Nymphont.